Multi-Booting Windows
People who haven't seen my machine doubt whether I could really boot multiple versions of Windows. They tell me that I'm only bullshitting them. Well I shit you not. So I'm gonna tell you how I setup my machine to multi-boot Windows 98, ME, 2000, & XP.
Here's my checklist:
1. Partition Manager
A good partition manager is what you really need for a successful machine capable of multi-booting Windows. I use 2 Partition Manager. The first one is Windows XP's built-in Logical Disk Manager. The second is Ranish Partition Manager included in the Techworm Boot Disk.
I use Ranish Partition Manager before installing Windows XP. That's what I installed first when I setup my machine. I have a Seagate 20GB HDD and I gave Windows XP 11GB of disk space. Once XP has been installed, that's the time I partitioned free spaces to be used by other versions of Windows. When installing XP, you will be given a chance to partition the disk. You may opt to use that but please use your common sense and don't create a single partition for the whole disk. Unfortunately, I will not be able to provide you with screenshots for the simple reason that I don't have a camera with me.
Techworm can be downloaded from the internet. Just google it out and you'll be able to download the file. Run the exe file, pop in a floppy disk, and after a few seconds you'll have your own Techworm Boot Disk. I suggest you keep this in a safe place. It's been saving my ass for quite some time now.
Boot Techworm, choose Skip Startup, then select Himem.Sys. Once the A:> prompt appears, type in part then hit enter. Ranish Partition Manager would pop-up and if you know how to read and understand some simple commands, you'll be able to partition your disk to your liking. I suggest you give a single partition first for XP then let XP handle all the other partitioning needs.
Once XP has been installed, open up Windows Explorer. Right-click on the My Computer icon on the left pane then click on Manage.
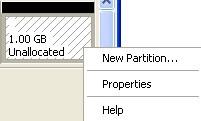
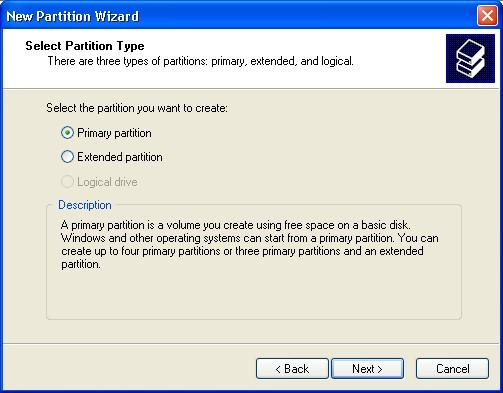
Now that you have the Computer Management window, click on Disk Management on the left pane under Storage. the disks will then be presented to you. Now all you have to do is right-click on a free space (Unallocated) for Disk 0 on the bottom-right pane. Select New Partition. Then select the defaults.


If you're gonna install Windows 98 or Windows ME, please select FAT32 for the simple reason that those versions of Windows will never recognize an NTFS formatted partition.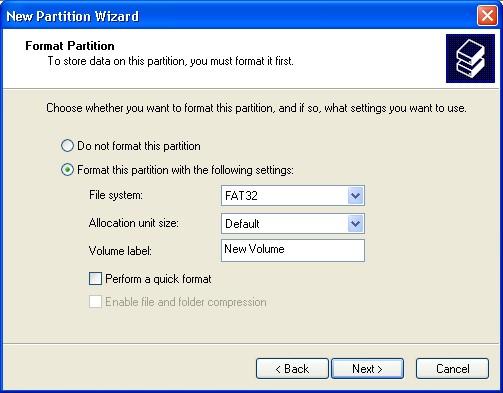

Now the reason why I recommend using XP's Logical Disk Manager is that it is easier for beginners to use than Ranish. I use Ranish everytime I partition my hard disk because I could set up a Linux Ext2 or Swap partition.
2. Boot Manager
Selecting a good Boot Manager is tough coz it will depend on your system. If you're going to install Linux, then use either LILO or Grub. Make sure to install them on MBR. If you're gonna boot up only versions of Windows, then use OSL2000 which you could download on the internet. To use it properly, you need to register and obtain a serial for this application. OSL2000 is quite safe, you install it and it will back up your MBR so you could uninstall it in the future. You need to have an extra Floppy Disk though in order to do that.
One technique I've tried whenever I install Linux is install Grub or LILO to the Linux partition then use OSL2000 on the MBR. Once my machine has booted up and I select a Linux partition, I will bring up Grub or LILO.
You could also use Windows XP built-in Boot Loader. I'll tell you how to configure that later. But just make sure you install the boot manager last.
3. Belarc Advisor
You'll need this for your hardware and software. It will also print out the Serials used by all the applications installed.
4. Legal copies of Windows.
You don't want the IP Police after your ass!
5. Patience
You're dealing with Windows... trust me, you'll need this. It might also take about a day or two to install everything. Not to mention a week to configure it to your liking.
6. The Steps to Setup your Machine.
A. Backup all you important data
You can never go wrong with this advise. You're dealing with computers, it is always wise to heed this advise. It's very helpful once you have a DVD or CD burner.
B. Know your hardware
List everything down. Open up Device Manager and take note of all the hardware that's listed there. Important hardware to take note includes:
a. Video Card or Display Adapters
b. Ethernet Card or NIC
c. 56 K Modem
d. Printer & Scanner
e. Harddisk Brand and Capacity
f. CD-ROM, CD-RW, DVD-ROM, DVD-RW Drives
g. Processor & Motherboard Make & Model
Use Belarc Advisor for this, also downloadable on the internet.
h. SCSI & RAID Controllers
i. Sound Card
j. Other Pertinent Hardware like keyboard & mice (if they're not the standard PS/2) and also other game controllers.
C. Backup your Device Drivers
Once you've listed down your hardware. Search the internet or your manufacturers website and download all the drivers you need. Make sure you download all drivers for all versions of Windows you're trying to install.
Pat yourself on the back if you still have the Hardware CD that came with your computer when you bought it. You will need it including the CD for your harddisk and motherboard.
D. Backup all your Softwares.
Take note also of all the softwares installed on your computer. Download them then burn them on a CD. Take note of all the serials used. Belard Advisor is also good with this.
E. Prepare to spend a day or two setting up your PC.
This is the most important part of this process. Don't worry, once everything has been setup, you'll be proud of your achievements.
F. Delete All Partitions On Your Hard Drive
Boot up using the Techworm Boot Disk. Enter Ranish Partition Manager then delete all detected partitions.
G. Create One Partition
Hit Enter, select FAT32, then type in in Kilobytes how much space you wanted to set aside for Windows XP. Use a calculator and remember that 1MB=1024KB and 1GB=1048576KB. Don't be surprised once you have Windows installed, it will show you another value. Ranish Partition Manager and Windows don't really work together when it comes to the calculation of disk space.
After typing in the values you need, select Format Now then select Quick Format. You can do a surface test later when installing Windows.
Hit "B" to make that partition bootable then hit "F2" to save changes to MBR.
Hit "Esc" to get back to A:> prompt.
Eject the Techworm Boot Disk
H. Install Windows XP
Place the Windows XP CD on the CD tray then hit "Ctrl+Alt+Del" on your keyboard to reboot.
This is pretty much straight forward. All you have to do is read then understand and you'll be able to install Windows XP without any hitch. It might take you a few hours to completely install it. Make yourself some coffee or something. It will take awhile but you have to be there while installing XP.
A comprehensive guide will be presented once I have my own camera and a borrowed harddisk.
I. Make sure Windows XP boots
Once Windows XP works, it is up to you if you want to configure it to your liking or if you want to configure it later. To prevent headaches in the future, I suggest you leave XP in it's default settings. Install all the drivers and softwares later once every OS that you want has been installed.
J. Create A New Partition for other versions of Windows
Launch Computer Management. Select Disk Management, then create a new partition for other versions of windows.
I'll say it again, if it's Windows 98 or ME, select FAT32. If it's another version of XP or Windows 2000, select NTFS.
This is a good time to create all the partitions you need. Create 3 partitions if you want to install 3 versions of Windows.
Please be informed that each Hard disk is limited to 4 Primary Partitions. If you want 8 Partitions for 8 versions of Windows, create 3 Primary Partitions then create an Extended Partition. Inside the Extended partition, you can now create 5 more Logical Partitions.
K. Hide the Windows XP Partition
Restart your computer then pop back the Techworm Boot Disk. Launch Ranish Partition Manager, select the XP partition then hit "Ins" or "Insert". Select "Hidden NTFS" or "Hidden FAT32", whichever filesystem you choose when you installed XP. This will make sure nothing will be overwritten when you install other versions of Windows. Make sure also to setup the partition you're gonna work on next to bootable.
L. Install the other version of Windows.
Put the necessary CD on the CD tray then reboot. Install that specific version of Windows then make sure it boots up. Configure all settings later.
M. Repeat Steps K-L for other versions of Windows
Self-explanatory. Please remember to hide all the other partitions and set the partition you're working on to bootable then install Windows.
N. Install the Boot Manager
Unhide all the other partitions and set the XP partition to bootable. Hopefully it will bootup. If not, that's still ok. As long as you could boot a version of Windows, you could still install OSL2000. Double-click on setup32.exe for XP & 2000 and setup16.exe for 98 & ME. Although there's some problem installing OSL2000 for ME, just follow the instructions and you'll be ok.
If you want to use XP's boot loader but can't boot XP, put the XP CD on the CD tray then reboot. Go to Recovery Console then type "fixmbr". If you can't access Recovery Console because you didn't create a Recovery Floppy, just wait until it goes to a prompt where it allows you to type in a command. After fixing MBR, reboot, then you'll be able to boot Windows XP.
I'll be more detailed on this later.
Now it's time to configure XP's Boot Loader. Launch Windows Explorer. Right-click on the My Computer icon then click on Properties. Once you have the System Properties window, select Advanced tab then click on the Settings button under Startup and Recovery.

Now that you have the Startup & Recovery window, click on the Edit button. A notepad would appear. Edit it to your preferences.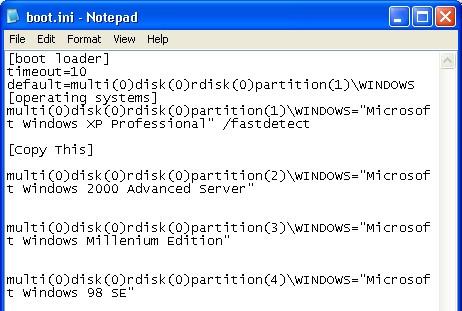
O. Test your System
Reboot then test your system. If everything has been setup as it should be, you should have a multi-booting PC. If not, please email me so I can help you out.
Everything listed here does not guarantee that your system will work. This is what I did and it did work. But I cannot guarantee that yours will especially since this guide is not comprehensive and detailed enough.
Wait until I could purchase a good camera and I could borrow a hard disk to test it on so I could provide you with a much more concise guide.
Any problems, please email me so I could help you out as much as I can.
All products listed here are trademarks or copyright of their own respective owners.
For the person who thinks I'm bullshitting, Up Yours Motherfucker!
![]()